Baby's first Jenkins deployment
Published on 09/08/2024 under DevelopmentFrom the total automation department:
Update 15/10/2024: I moved the site back to Cloudflare pages for a bit since I need to do infrastructure changes to the server. I needed a better solution than what I came up with below and I’ll write up a cool post about it once I finish the upgrades.
Recently I have taken up an interest in moving my deployments back to my own hardware, partly because of my stubborn reasoning. I decided to move my website back onto my VPS and I chose to automate its deployment using Jenkins. I also have plans to deploy some more software in the near future, but since I’m relatively new to Jenkins I decided to start a bit smaller for now.
The plan is to use Jenkins to pull changes from my git repository containing my website’s code, build the site on the server automatically, and then deploy the artifacts to a local nginx web server.
Also a foreword, I am genuinely quite new to Jenkins and deployments in general, so while this post will walk through my setup process, I cannot guarantee that it is the best way to be automating a deployment like this. If you are more knowledgeable than me in this topic and have some good suggestions, then reach out to my email!
What is this website even made of
I wanted to avoid dealing with massive headaches caused by massive frameworks, especially a lot of the popular JavaScript frameworks that have plagued the internet as of recent. I also wanted to make sure this website could run in as many places as possible, so I ended up using Jekyll to build this site.
Jekyll being a static site generator means I can just dump the resulting files after building onto any old web server and call it a day. It does not need to rely on a specific operating system or specific version of NodeJS or other nonsense. However, one major downside (depending on what you use your website for) is that being a static site generator, Jekyll cannot dynamically modify the contents of a page in real time. In my case I don’t care though so let’s continue on.
Configuring the Jenkins project
I chose to start with a freestyle project since this project won’t be very complicated. I configured the git repository under Source Code Management to point to my website’s git repository.
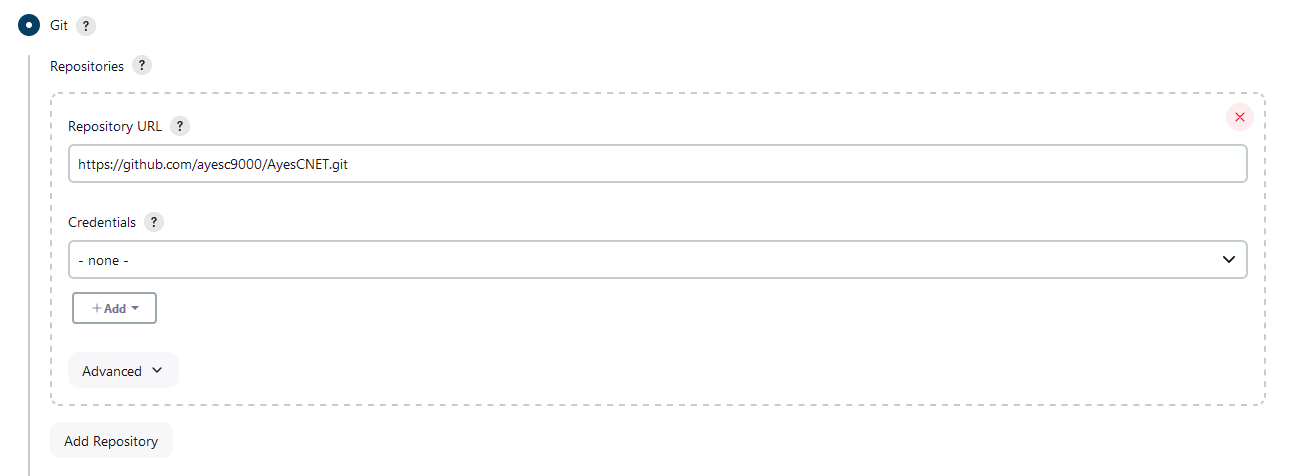
However, the problem is that Jenkins doesn’t know when the repository has been updated. If you are using GitHub, it is possible to set up a webhook and use the GitHub Jenkins plugin to automatically trigger a new build, but I am not able to use that here since my Jenkins is set up in such a way that GitHub cannot talk to it. The solution? SCM polling.
Under Build Triggers there is an option called Poll SCM. Turning it on will display a text box where you can write a schedule to poll the repository for changes. The schedule uses syntax similar to cron, and is relatively simple to figure out. Or you can steal mine from the image below, which polls usually every hour but uses the hash (H) symbol to balance the load with other jobs.
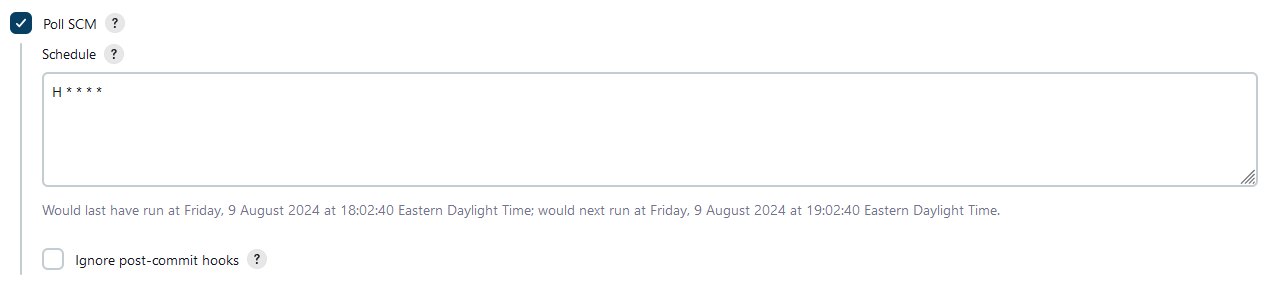
The benefit of doing this over just rebuilding the site periodically is that Jenkins will only start a new build if the current head has changed since the last build took place. This means that you can poll far more often while only building the site when a change takes place.
While I am configuring the project, I also turned on Delete workspace before build starts under Build Environment just to make sure that the workspace would always be fresh on every build.
Lastly, I wrote up a shell script using the Execute shell build script to perform the actual building of my website. Jenkins does not currently have a plugin to manage Ruby for you at the moment, so you will need to install Ruby onto your server and make sure all users have access to it. You may also need to install bundler manually since Jenkins by default usually will not have permission to install gems.
sudo apt install ruby-full
gem install bundler
I’m using Debian 12 Bookworm here, but you can consult the Ruby docs for assistance on installing Ruby on other distros.
The full shell script I wrote for the build step is below:
# Build
bundle config path 'vendor/bundle' --local
bundle install
bundle exec jekyll build

# Deploy
rm -rf /var/www/ayesc.ca/*
cp -r $WORKSPACE/_site/. /var/www/ayesc.ca
The build portion first sets up bundle to install dependencies into a folder
named vendor in the workspace, rather than system-wide. This just avoids
having to deal with permissions problems related to bundle/gem trying to install
to a root-owned directory without giving the Jenkins user root/sudo permissions.
Afterwards, we install all the dependencies as usual.
The final part tells Jekyll to build the website. The resulting artifacts are
then copied into /var/www/ayesc.ca where nginx will serve them to users. This
deploys the site pretty primitively, but I don’t yet know if there is a better
way and it gets the job done.
Actually, speaking of deploying,
Intermission: Permissions
Hey that rhymes!
I did not want to give Jenkins ownership over /var/www, so instead I used the
www-data group and added the Jenkins user as a member. I then set the owner of
the web directory to the www-data group, set the permissions accordingly, but
no dice.
Turns out that I forgot that users need to log out, then back in for the changes to take effect, so I spent over an hour diagnosing a problem that didn’t actually exist. After a quick reboot, everything worked fine. In hindsight, I could have also just restarted the Jenkins process specifically. Definitely felt a little silly there…
Setting up nginx
Nginx is usually configured well enough out of the box to begin serving up a website made with Jekyll, but there are some tweaks that can be done. I am not going to go through setting up SSL or securing your nginx server here as there are smarter people than me who have already written about that.
I have written a sample version of my website’s configuration below. My website uses a mix of links ending with and without .html, so having support for both was a necessity. I also added support for my custom 404 page and configured the website root to be at the folder where Jenkins will copy its files to.
My SSL and security configurations have been omitted for simplicity. In fact, my website does not support HTTP at all and will simply redirect HTTP requests to HTTPS.
server {
    listen 80;
    listen [::]:80;

    server_name ayesc.ca;
    root /var/www/ayesc.ca;
    error_page 404 /404.html;

    location / {
        index index.html;
        try_files $uri $uri.html =404;
    }
}
With this, nginx happily serves up my generated website!
It’s also worth noting you could use nginx as a reverse proxy with the built-in web server included with Jekyll instead, but this solution has less complexity, is easier to maintain, and avoids potential performance bottlenecks.
Some closing words
It was really satisfying to finish this project, and to take back some control over where my website is running.
While this might suck as a how-to guide, it isn’t really intended to be that. This is more of a journal for me to document how I solved a problem that I happened to have. I intend to do way more of this in the future as a personal pseudo-knowledge base of sorts. I also think it is just really interesting to document your experiences and challenges to reflect on later in life.
I also want to touch on failure. This took several days to do. My Jenkins project took 21 builds before it successfully built and deployed my website due to a variety of factors. Nginx gave me weird and strange problems that took me a lot of time to solve. But it was totally worth the time and effort in the end as not only did I get a lot of satisfaction when I finally got everything to work, but I also learnt important things about how Jenkins, Jekyll, and nginx work along the way. Even if I never use any of this software again, developing these problem solving skills is still a great trait to have especially in IT and computer science.
Really, the most important thing to take away from this is to finish things. If you have a project you have been putting off because you just don’t know how to overcome a problem, keep working away at it. I promise you when you finally figure out the solution, you will not come away from it empty-handed.
Baby's first Jenkins deployment by Liam "AyesC" Hogan is licensed under Creative Commons Attribution-NoDerivatives 4.0 International


